3 Ways To Style Wide Leg Trousers

Sunday 29 October 2017
For the girl who's wardrobe consists of tight figure hugging clothes (and lots of pyjamas) wide leg trousers were an absolute no go! Especially at only 5 foot 3 anything long and baggy had me running for the hills (or as far as my little legs could take me). However I'm always up for trying new things with fashion and I've become tired of the same old pair of black jeans. So off I trundled to the nearest Bershka to hunt down some wide leg trousers that didn't make me resemble a small tent. My, my I was pleasantly surprised by a beautiful monochrome thin striped pair and for only £20! The best part is how versatile they are, adaptable to an evening look, work and even comfy enough to just chill around the house in. I am definitely converted from a jeans to a trouser girl now and I couldn't wait to do a post on how I style them.


Please excuse the fact I look like Wednesday Addams when she's grown up... I tried to be edgy and autumnal but it turned out to be quite gothic. Kinda like it though.


Bardot Blazer


Bardot Blazer- Missguided £40   Buy Similiar Here

Femme Fatale Lipstick- Smashbox- £17


Structured Tailoring


Anything Cropped


The beauty of high waist trousers is that they literally hide everything! If you're having a bloated day just shove a pair of these on and no one will ever know, also perfect for going to an all you can eat restaurant. It's a win, win.They look stylish and are great for hiding that extra portion of fried rice! Wear with a baggy crop top for those more casual days, it'll only show the smallest part of your waist making the outfit ultra flattering. 


Crop Slogan Tee- Bershka- £4.99     Buy Similiar Here

Leather Jacket-Zara- £49.99    Buy Similiar Here


Until next time, 
Sadie xoxo

What To Wear With A Grey Check Blazer

Wednesday 18 October 2017
There is no denying that grey check is the hottest print of the season, it's the autumn equivalent of gingham (which I hope doesn't go anywhere as it makes up half of my wardrobe!) and it's extremely versatile. Wearing a grey check blazer is a very quick and easy way to look effortless, cool and terribly stylish. Nothing says 'I'm a fashion blogger' quite like it, are you even allowed to be one if you don't own one??  The best part is they literally go with anything! Need to look smart for an interview? Grey check blazer. Want to jazz up jeans and a tee? Grey check blazer. I wonder if I'll ever love a piece of clothing as much?


Here's two looks I've put together wearing my beloved grey check blazers.

Outfit 1. Suited and Booted


If the guys can do it, so can we! I honestly never thought I'd be cool enough to wear a suit co-ord and baker boy hat, but I felt surprisingly comfortable traipsing around London in this get up.

The ring belt on this blazer cinches you in at the waist to create a more feminine silhouette and black ankle boots dress it down for day time. The hat I've had for ages but haven't been brave enough to wear, I still feel a little bit like Oliver Twist but I kinda like it.

Blazer- Bershka- £25.99 (Can we talk about value for money here? Most blazers in other high street shops were starting at £42)

Trousers- Bershka- £17.99

Hat- Topshop- £14    Buy Similiar Here

Boots-Primark-£16


Outfit 2. PVC and a Slogan Tee


This is definitely a more casual 'everyday' outfit, I've even wore it to work a few times. The long relaxed fit of the blazer is great for pairing with a tight skirt underneath, a perfect way to dress down PVC which is another trend I have been absolutely loving atm! I live in slogan tees and the fact the red on this one matches my red boots is just an added bonus.

A prime example of one of my 'go to' outfits when I don't know what to wear, simple and stylish!


T Shirt- Miss Selfridge- £14   Buy Similar Here

Skirt- Primark- £8


Thank you so much for reading. Huge shoutout to my bro Marlon for helping me take these pics, they came out so well! I've been really trying to make more of an effort with my fashion images, who cares if you get funny looks in the street? And are constantly in fear that someone will come out and tell you off for taking pictures next to their pretty house.

Until next time,

Sadie xoxo


6 Steps To Make Your Lips Look Bigger- NATURALLY

Wednesday 11 October 2017
For as long as I can remember I have wanted bigger lips. I don't know if it's because I spent my teenage years obsessed with celebrities like Angelina Jolie and Adriana Lima or because I genuinely felt bigger lips suited my face (oh the trivial insecurities of teenage me). So ever since I was 15 and discovered lip liner for the first time, I have desperately been trying everything and anything to make them look bigger! I once read that cinnamon is a natural lip plumper so I mixed some with Vaseline, slapped it on... and instantly regretted it. Fifteen minutes with a cold flannel on my red raw lips told me that I needed to find other ways to enhance my lip size!

So keep scrolling if you'd like to see the six steps I use to fake your way to bigger lips!

Before Picture


1. Exfoliate


Just like your face, your lips need to be exfoliated too! Either use a toothbrush or an edible lip scrub (I love this apple flavored one from Grounded) to scrub away any flakes. Not only will this make your lips soft and smooth but it will boost circulation meaning they'll automatically look more plump!


2. Hydrate


Moisturised lips will always look bigger! Plus makeup applies 10X nicer on a hydrated base. I have a no frills no fuss approach to lip balms as I'm quite prone to allergic reactions. Go for a waxy balm enriched with oils & butter over something wet like Vaseline as it could end up drying lips out more. This Nivea one has never let me down!


Essential Care Lip Balm- Nivea- £1.65


3. Contour


One of my fave tricks is to use contouring to fake the appearance of bigger lips. Simply add some bronzer underneath your bottom lip and pop a bit of highlighter above the cupids bow. This will add more depth to your lip line, making your lips look poutier.


Bronzer- Freedom Contour Kit- £3.50

Highlight- Smashbox Halo Wand in Pearl- £26


4. Overline

The trick with over-lining your lips is to only go slightly outside your lip line to ensure it stays looking natural. Take a look at where your lips need more plumpness, for me my top lip is smaller than the bottom, so I overdraw it to balance it out. You can even change the shape of your lips by making your cupids bow flatter or pointier, its all personal preference so have a play around and find what suits you.

I like to start by drawing out my natural shape first with a nude liner.


Then I use a darker colour to overdraw and add more definition.


Filling in the sides and adding lines in the centre adds to the 3D effect and ombre look(Leading on to the next step).


NYX- Slim Lip Pencil- Mauve- £3  (These lip liners are incredible for only £3!!)

Mac- Pro Longwear Lip Pencil- Absolutely It- £15.50 (Incredible colour pay off & staying power)


5. Ombre

An ombre style lip is not only on trend but the best way to make your lips look larger! Things that are lighter automatically look bigger so using a lighter shade in the centre of your lip does exactly that. For most natural looking results use two similar lip shades, darkest on the outside. Nudes and lighter colours are better as darker colours can sometimes minimise lips.


Add the highlight shade to the centre of the lip


Maybelline- Color Drama Lip Contour Palette- Blushed Bombshell- £11.99

This palette is perfect for ombre as it includes all the colours you need, a highlighter and a little brush!


6. Gloss

To finish the look off pop a bit of sparkly gloss or a cream highlighter into the centre to amp up the drama even more. The shiny particles will play tricks with the light making your pout look larger than life!


Estee Lauder gloss- Light Pink


And voila! Bigger lips. Now you should probably be feeling a little bit like Kylie Jenner/Angelina Jolie....But seriously look at the difference a bit of makeup can make and no injections needed! Do it correctly and the only thing you should have to top up is the lip gloss, meaning you can keep up the illusion of bigger lips all night.


Have you ever tried anything crazy in the name of beauty?? Let me know in the comments.

Love,
Sadie xoxo

Transitional Trends: Rocker Vibes

Tuesday 3 October 2017
Autumn has always been my favorite time of year. The leaves turn orange, you buy new stationary and there's that faint smell of basic white girl excitement, as we await our beloved Pumpkin spice lattes to arrive. Plus fashion just seems to get really really good? I don't know if it's because I'm so sick of seeing neon vest tops and denim shorts or just the general British public with their skin on show, but I seem to completely crave Autumn fashion when it comes around! Believe it or not, I actually like wearing tights. I love ankle boots and shearling jackets and cropped jumpers and basically any piece of clothing that's slightly autumnal but still cool enough to wear in October sunshine. So here's a little outfit I'm loving wearing whilst we transition from Summer to Autumn (yay).


Rocker Vibes


Autumn 2017 is the season of trend recycling. A lot of trends from last Winter are back with a vengeance! Which makes it oh so easy to just revamp your last winter wardrobe?

Band tees are still going strong, even better with a choker/ v-neck cut out, perfect for wearing casual with jeans or dressed up with a skirt. So ready for these punk-rocker vibes I genuinely feel like a boss bitch who's ready for anything when I wear outfits like this. 
Metallica Tee- Topshop Sale


Corsets are not going anywhere, they're probably going to be even bigger than they were before! I love this black denim skirt with inbuilt corset, it's flattering, insanely easy to style and a subtle nod to the corset trend without being too crazy. Wear with almost anything tucked in!
Black corset Skirt- Topshop £32


Red Boots are a sure fire way to be bang on trend this season! Not only are they a gorgeous update on the classic black ankle boot but they surprisingly go with so many outfits. They also come in an array of styles, PVC, Sock boot, suede and even over-the-knee. Red is definitely the hottest color this Autumn. The muted tone of these boots make them easy to wear and the chunky heel adds comfort and it-girl cool. Plus Vagabond are literally the best quality shoes I have ever worn!
Red OLIVIA Boots- Vagabond Shoemakers


Added extras for bonus 'Cool Girl' points

- Vintage Acid-Wash Levis Jacket, obvs from Camden Market
- Western style half moon choker  (Pretty Little Thing)
- Harness Bralet worn underneath T- Shirt (Primark)


What trends are you loving this Autumn?

Thanks,
Sadie xoxo


The Glam Girls Guide to Everyday Makeup

Tuesday 26 September 2017
If you're a die-hard makeup lover you might find you seem to only have two makeup looks, full insta-glam or completely homeless, with absolutely no in-between. This tends to be because even when we tell ourselves we are doing a 'natural' look, we continue to add more and more until we are wearing more contour than the Kardashian family combined. I get it, makeup is fun and it's hard to resist the urge to keep putting on more of the good stuff, purple highlighter for a Sainsbury's shop? Why not! But recently starting my first office job I've found myself wearing a much more toned down look.

Working in beauty based jobs since I was 16 means I've always known the mantra 'Makeup is your uniform' and trust me I'm not going to miss having to do a full smoky eye at 7 in the morning. So now I'm really enjoying a new natural makeup routine. But don't get me wrong I don't think I'll ever lose my love for highlighter! 

So keep reading if you'd like to see my natural everyday work/school makeup look for the girls who are obsessed with being glam.


Base

The trick to keep the face looking more natural is to only add coverage where you really need it. Under eyes, blemishes and discoloration tend to be the biggest worries so cover them with concealer and keep the rest really lightweight. Another tip is if you absolutely have to wear powder to keep the oil away, spritz a hydration spray over the top, it'll break up the 'cakey-ness' of the powder and keep skin looking real and fresh again.


Primer: Freedom Strobe Cream
Foundation: Too Faced Born This Way
Concealer: Maybelline Under Eye eraser 
Powder: Smashbox Photo Filter
Fixing Spray: Smashbox Primer Water


Cheeks


Even the most natural looks need something on the cheeks! A light bronzer under cheekbones and on the forehead will add tan and dimension to the face whilst a pop of rose blush on the cheeks gives a youthful appearance. Now, this wouldn't be the glam girls guide if I didn't add a little highlighter to this look. Find a neutral color which compliments your skin tone, I chose this champagne one as it replicates the look of skin, meaning it'll give a subtle lit-from-within glow. This is also perfect if someone is getting on your nerves as hopefully, their negativity will deflect and bounce off your highlight, its a win-win!


Bronzer: Mac Dark
Blush: Mac warm soul
Highlight: Smashbox Hollywood n highlight

Eyes

It's a fact, that the less eye makeup you have on the more natural your whole face will look. Years ago the thought of leaving the house without my signature eyeliner wing would've scared me to death! But now I think there is something so pretty about minimal eye makeup. Obviously, I always have to be a little bit extra so I use an eyelash primer to thicken, lengthen and strengthen my lashes first then mascara to ensure they're extra huge! If you really hate the thought of leaving the house with only mascara then add a little bit of bronzer to the crease of your eyes, it'll give them some dimension without looking over the top.


Lash primer: Smashbox Photo Finish Lash Primer
Mascara: Maybelline Big Shot 
Brows: Anastasia Beverly  Hills Diprbrow in Chocolate
Brow Setting: NYX Tinted Brow Mascara


Lips

Does anyone else feel completely bare without something on their lips? Even if it's just a colored lip balm, I always wear something. I tend to switch between a coral nude and a pink nude (I know it's boring) depending on how I feel. Just find a natural color that's flattering for you and you're good to go! Lip liner is, of course, optional but for me a necessity.


Lipliner: NYX Mauve
Lipstick: Smashbox Audition


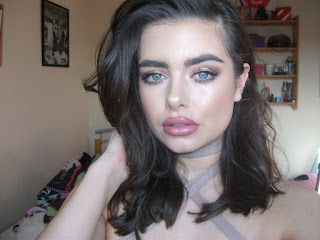
So whether you're a self-confessed glam girl who needs help trying to tone it down for those everyday situations or just looking for some makeup inspiration. Here is the final look!


Thank you so so much for reading, I hope you liked the look or found it helpful! Please comment and let me know what you do to tone down your glam makeup looks.

Sadie xoxo


Step by Step; Big Sexy Curls for Thin Lifeless Hair!

Wednesday 13 September 2017
The grass has always been greener when it comes to hair. Girls with big curly hair dream of sleek and smooth, whilst girls like me with poker straight want huge, voluminous waves! I'm definitely all about learning to love what you have and am completely appreciative of the fact my hair looks fine without even brushing it for a few days. But of course, I can't help but lust after a bigger more glorious mane (Cheryl Cole vibes please). In my many attempts to achieve sky high volume, I've picked up a few tips & tricks which I will be sharing with you in this post! This tutorial works for bob to long lengths and particularly well for the thinner to medium hair.

If you'd like to learn how to get Instagram worthy, traffic stopping, big bouncy curls which last all day (sometimes two) then please keep scrolling gals.


Big Curls


Before Picture


Here is my hair naturally without any products, heat or styling. It is fairly thin and lackluster but takes to products well.


Step 1: Wash Well

Hair is always easier to manipulate once it's wet, so start by giving it a good wash. Your shampoo and conditioner should always compliment the look you're trying to achieve. Use a thickening or volumising one to boost bounciness at the beginning. I adore Bumble and Bumble Thickening Shampoo £20 and Thickening Conditioner £20, my hair definitely feels plumper after using these.


EXTRA AF TIP: Use a scalp exfoliator and do a mini head massage to get circulation flowing and get rid of all those nasty dead hair cells. Not only will your scalp thank you but it will make all your other products work so much better! 

Step 2: It's all in the prep

Just like anything, preparation is key when it comes to achieving the perfect style. Not only will it help heat tools work better and your hair thicker but it will also make your style last a lot longer. I use what can only be described as a 'Miracle in a bottle' the Carb Cocktail £22 from Color Wow. It works by bonding a fiber mesh around thin strands to instantly fatten them up, it also restores lost proteins which are a result of color damage. I literally feel like I have new hair after I blow dry with this, I look in the mirror-like damn who is this new Felicia with thick hair ;)


EXTRA AF TIP: Add a thickening mousse into the roots to ensure ultimate anti-gravity height!

Step 3: Blow it all out

This is probably the most technical step but also the most crucial! How you blow-dry your hair is the way it is going to stay until you next wash it, it's also the perfect opportunity to get big, BIG hair! Spritz a little heat protect all over to prevent damage, I use the Vo5 Protect £4.40 to ensure my style stays in place whilst protecting. I then use a round brush on small sections, making sure I dry underneath to boost volume at the base.


EXTRA AF TIP: Hold your head upside down and blow dry the underneath for extra va-va voom!


Step 4: Curls for the Girls 

Now your hair is dry you should start to see a dramatic difference in the volume you've already created, some days I'm happy with just blow drying but when I want a more glam look I'll curl my hair. I'm using the Babyliss Pro Curling Tong £20, I've had it for over 4 years and it's incredible, especially for the price! I do prefer wands usually but tongs are great for a bigger more relaxed curl.


- Start by clipping the top portion of your hair and curling the underneath first, working your way up.

-Grab a small section of hair and curl away from the face, I always curl the sections nearer to my face away and then randomly mix up a few near the back. This will add more volume and texture, stopping the curls forming together in one clump!

- Repeat until you have curled all your hair.


EXTRA AF TIP: After each curl, hold the curl up in your hand and let it cool in place, this will help to 'set' the curl as it forms its shape whilst it's cooling. This ensures a bouncier curl which will last longer.

Step 5: Finishing Touches

Last but definitely not least is those extra steps to finish the look which gives it the WOW factor. I like to run my hands through my curls to give them a softer look. Then spritz some texturizing spray to give hair a sexy, messy look. I am in love with the Color Wow Style on Steroids spray £20 it stops the curls forming together and gives them an undone tousled look, it's also the only texturizing spray for colored hair, keeping it moisturized and bouncy. Add hairspray if you must but I tend to avoid it when I can as it weighs hair down and can be too sticky!


EXTRA AF TIP: Lightly backcomb the roots of your hair with a small bristle brush to give it volume which lasts. I also like to do this to the ends of my hair for a messy sexy look.


Finished Look


And there you have it, big sexy curls! I definitely don't do all these steps when I curl my hair, sometimes I literally just use a wand. These steps might seem OTT (that's just me guys) but I promise you when I do this my hair will literally stay perfect for a few days. Definitely worth it for a special event or night out.


Thanks so much for reading, I hope you liked my first hair tutorial. I enjoyed doing this so much as I especially love sharing tips and tricks with you guys! Let me know if you found it helpful or tried any of my tips out.

Thanks,
Sadie xoxo